Crown of Glory:
Europe in the Age of Napoleon
Introduction:
- Hi my name is Steve, but I play these games under the name Ralegh. I was
a beta tester for Western Civilization, and helped the Matrix beta team look
at COG. During that process I wrote a lot of guidance on what game concepts
meant, and explaining things in different ways: these became the infamous
Ralegh Guides. The feedback from the beta team was that the Ralegh Guides
really helped them get on top of game concepts so some of the guides have
been included with the manual, and here are some more! This tip guide has
been extended to include stuff posted to the BB up to Aug 2005. I have not,
however, taken out tips that might have made it into the 1.2 manual.
- I am just a player too not the designer of the game. I hope I havent
made any mistakes, and if you find any I would be delighted to hear about
them. Also delighted to get any other tips or ideas people have I haunt
the matrix forum at http:/www.matrixgames.com/forums/tt.asp%3Fforumid%3D197
as well as the beta forum, where work is continuing for the next release of
the game.
- I have some credibility to be giving game advice: I have won COG
at its hardest level of difficulty with every nation several times through
during the betas and release versions, of the game. I mainly play the 1805
(or standard) Campaign, so if anything doesnt apply to the campaign you are
interested in, well, tough. (I do also like the 1792 game so there is some
specific stuff about that in here).
- I am Australian, and we spell things a little differently to some
of you get over it.
- Anybody want to play a PBEM game? I am looking forward to playing
with people!
The Ralegh Tip Guides.
1
1. Divisions,
Corps and Armies. 2
2. Divisional
Strength and Readiness. 2
3. Effects
of National Morale. 2
4. Privateers
and Merchants. 3
5. The proper
use of militia. 3
6. Economy
for Dummies. 3
7. Tips about
Cash. 4
8. Finally
a few notes on trade. 5
9. Anatomy
of an economy out of control (or 'how supply killed my economy')
5
10. Working
with AI Allies. 6
11. Extra Tips
(from the manual) 6
12. Notes on
Quick Combat: 7
13. Notes on
Naval Combat: 7
14. Reinforcing.
8
15. Pursuit
and Retreat 8
16. Ralegh's
Rapid Guide to HexWar 8
17. HEXWAR
EXAMPLE. 11
18. Ralegh's
tips on starting a new game. 12
19. On naval
transport of troops: 13
20. Ralegh
on the Briefing Docs. 13
21. Ralegh
on Cavalry Charges and Reforming Cavalry. 14
22. Notes on
the Power Settings. 15
23. Ralegh
on Textiles. 15
24. Ralegh
on Provinces. 16
1.1.
In COG, divisions are the units
that you build, and which move and fight. Divisions can be joined in a corps.
Corps and divisions can be joined in Armies. Each Army can hold up to 8 "units"
- either divisions or corps - plus leaders. Each corps can hold up to 6 divisions
plus leaders. However, an army can only hold a maximum of 18 divisions, no matter
how arranged in corps [except France, who is 20]. (Cities can hold divisions
to their number of walls, and fleets can hold 10 ships, except for Britain who can hold 12.)
1.2.
The Corps System upgrade
allows one more division per corps, and the French have a native advantage allowing
7 divisions per corps and 20 divisions in an army. (So in 1805, the French can
put 8 divisions in a corps!)
1.3.
What impact does the arrangement
into corps have?
1.3.1.
Units in the same army benefit
from the army commander's bonuses - units in corps/armies in the same stack
(even if in the same combat) don't benefit from that army commander's bonuses.
1.3.2.
A division could have a divisional
commander, a corps commander, and an army commander, and benefit from all three
sets of bonuses! - More leaders is good!
1.3.3.
There is a combat bonus for units
from the same corps actually fighting together - since that is how they trained.
And they move together.
1.3.4.
Corps provide a reinforcement
bonus units in a corps reinforce detailed battles at twice the normal rate.
1.3.5.
Most countries don't start with
corps. Get some corps FAST so you can organize your main force intelligently.
2.1.
Maximum 'health' for a division
is 1 x readiness, so normally 1.0. But if you dropped readiness to 60%, their
maximum strength would be 0.6. Units at the max of readiness won't accept any
more troops from the reinforcement pool. (Artillery normal maximum is .3, which
increases with particular upgrades.)
2.2.
Units below their maximum strength
receive a share of the reinforcements going out that month. Their share will
depend on whether it is in home, friendly, or enemy territory. Units must be
in-supply to receive reinforcements, though remember that units garrisoned inside
of a city are always considered to be in-supply. (I might be superstitious,
but I swear that units in the capital city get refilled faster!)
3.1.
Modifies production of resources
in each province controlled by the nation, ranging between 90% and 110% of regular
production
3.2.
Raises or lowers the morale of
units in the field by -.5 to +.5
3.3.
If the nation is at war, when
national morale is below -750, the nation has a 25% chance each month to surrender
spontaneously to one of its current enemies. I think that enemy has to have
troops in the nation.
3.4.
Riot: When national morale is
below -750, one or more provinces controlled by the nation may riot, destroying
one area of development in the province. The presence of a nations corps or
army in a province will prevent rioting from occurring.
3.5.
Insurrection: If a nations national
morale falls below -750, there is a 25% chance each month that one or more of
the nations provinces will stage an insurrection, either liberating itself
and becoming an independent country, or joining a foreign power. Only conquered
provinces can undergo an insurrection. The presence of a nations corps or army
in a province will prevent an insurrection from occurring.
3.6.
High NML gains you glory and low
NML costs you glory
3.7.
NML affects interest rates
3.8.
If AI NML drops under -350, they
clear the rally location set for them.
3.9.
NML contributes to the creation
of rebels (called insurrectionists in the game, I think)
4.1.
Privateers attack trade passing
through the sea zone they are in - any trade they capture is automatically put
on your stockpile. (ie. not about money - about wool or spice etc)
4.2.
You can use privateers to attack
merchants (to deprive the other nation of the sea zone) or other privateers.
4.3.
Merchants generate cash based
mainly on
4.3.1.
The levels of docks surrounding
the sea zone they are in (so trade near England is normally quite valuable) and
4.3.2.
The presence of other merchants
(as a real example, in the Adriatic Sea a single Turkish merchant was getting
125, when a US merchant came into the sea area too the Turkish income dropped
to 37) - I think this is partially competition driving prices down and partially
them getting some...
4.3.3.
The presence of privateers - CAUTION:
even your own privateers will wreck trade in the sea area
4.4.
NOTE: If your enemy has merchants,
you can attack them with fleets and privateers, or shadow them with your own
merchants to cripple the income they are generating.
4.5.
Many people get confused about the cash flow
from merchants. The amount you see on the strategic map isn't what you get -
it is the 'gross' amount. The 'net' amount will be affected by things like your
feudal level, waste etc. It will be a lot less. Be reassured though you gain
money. (Although merchants do cost upkeep, so
)
4.6.
If you want to play the economic
powerhouse Britain from many other games, get those merchants to work, and dont let
anybody sink them. Otherwise, youre just relatively rich, not enormously wealthy.
5.1.
When things get desperate, people
often send out militia into battle - I prefer to put the militia into garrison.
Similarly, when I am taking territory, I would prefer to have a militia division
handy to be the garrison, rather than detaching an elite combat unit.
5.2.
Set Militia to move to a corps
or army which is full, and they will follow it around like a puppy until you
have a city for them garrison - just make sure you cancel the 'follow me' command.
5.3.
Want to USE those militia? - Move
men from the militia unit into an infantry unit in the same province using the
Military Adviser screen. I often 'top up' key units manually rather than waiting
for reinforcements to trickle in.
5.4.
NBB: Morale doesnt matter in
siege combat militia are as good as guards either on the inside or the outside
of a siege. I quite like to have a stack of siegers see the section on sieging.
6.1.
The most important impact on your
economy is your feudal level. With a higher feudal level, you get more levies
and raise some feudal dues, but less productivity from the population (including
taxes) and less income from merchants.
6.2.
NB: For countries with a high
feudal level trying to raise money through merchants is very difficult. Changing
your feudal level has a short term impact on national morale (- can be 275 per
month for several months!), but may be worth it! It is interesting to try to
play with a very high feudal level...
6.3.
Income from provinces is based
on provincial stats its either wealthy or it aint. Banks tweak at the edges,
but the big impact is tax rate. Dont be afraid to become a high-taxing nation:
the real ones all had to. Just deal with the negative effects that high taxes
have on your national morale. One caution: you dont get income from provinces
with 3 enemy divisions in them, and half income if blockaded do it to them,
and dont let them do it to you.
6.4.
Production of goods in a province
is based on the province's underlying capability (made a little visible through
the highly misleading 'best resources' notation, but better seen from the Ralegh
Briefing for your country or Raleghs Consolidated Province List), the population
working on that resource, and any impact from provincial improvements. Population
working on a resource is based the labour allocation to that category. This
means that a high population province without 'iron' as a 'best resource', for
example, might produce more iron than a province that has the speciality but
a very small population. However, if there isn't much iron to be mined, even
a very large population won't produce much.
6.5.
HOWEVER, note that production
is a probability estimate: actual production will vary based on random factors,
and on national morale (which factors production by .9 through to 1.1).
6.6.
The best way to see production
is the production report - which reflects actual production from last month,
not attempted production for next month. Note that things like waste, presence
of enemy units, and probability impact have all affected your plans, so it is
a bit different from what you were trying to do.
6.7.
What resources do I want? Generally,
this depends on what units you want to build; whether you want to boost national
morale (and glory) with luxuries; and your food plan. Generally (unless I am
trying for a population boom), I want enough food for perhaps one pop growth.
I always want luxuries. The rest varies.
6.8.
OK - so what does Ralegh do?
6.8.1.
Horses and wine are produced by
farmers, and I always want both, so any province with a speciality in either
gets maximum farming (and I build more farms there). Cotton and textiles are
reasonably rare, so provinces specializing in these I usually max in textiles
(wool is pretty common). Luxury specialists I usually maximize on luxuries.
Then I will allocate a bit to things like iron and timber to build up enough
of a pool for any building desires I might have (artillery for example, or building
barracks). I will then allocate the remaining provinces to (a) extra food production
if I need it from the ones with some level of farms (b) labour production from
the ones with factories (c) and provinces still left I will allocate to luxuries
(or anything I am very short on).
6.8.2.
Every month I will open the production
screen to make sure there wont be any starvation or more excess pop caused than
I want - periodically (once a game year?) I will scroll through adjusting production
for new priorities.
6.8.3.
Anyone working on textiles can
work on 2 wool and 1 cotton simultaneously at no cost to me. So get some cotton
into that stockpile!
7.1.
Divisions, while in a city, require
only half upkeep cost; since upkeep is much higher for cavalry and artillery
it's very good to transfer these to cities when at peace. More importantly,
though, diplomats, armies and corps are quite expensive for upkeep
7.2.
Trade away embargoes on countries
you don't intend to trade with - France valued this in my latest game (as Turkey and needing some cash, I sold France me embargoing Sweden, Prussia, Britain and Spain - none of them would trade with me anyway! Besides, I was cash poor,
and couldn't afford to pay the upkeep on trade routes to them.) Also trade away
you respecting the neutrality of places you dont care about some of the other
players/AI might care.
7.3.
During a prolonged peace, put
your worst units (militia/irregulars) into an army or corps, and lend it out.
As Turkey, I rented the "Foreign Legion" (morale 1.3) to France, Sweden and Prussia at different points - and also rented most of them the "Syrian
Foreleg" (the crappy Syrian irregular cavalry corps). I have also rented
my fleet to France, Sweden and Britain at different points. This saves you paying some of the expenses on
these units during the peace, in addition to whatever you can raise for them.
7.4.
What do I trade for? Sometimes
alliances. Sometimes to get their overseas colonies (I love colonies - money
every month!). Sometimes for cash. Once I got France to promise to defend me for a year!
7.5.
Similarly, the AI will sometimes
pay decent amounts for a promise not to attack them for 3 years.
7.6.
The difference between the stockpile
numbers in the income report and the bottom of the screen is that the income
report gives you the gross immediately after production whereas the bottom of
the screen reflects the net after all your consumptions and expenses.
8.1.
Britain gets no wine - none at all - and very little horses. They have great
textiles, money, and iron. Other countries have other shortfalls - trade is
a way to try to give some of the stuff you make easily to get things that are
harder for you to produce.
8.2.
Beware however: the person who
establishes a trade routes pays CASH each month to maintain the route, and the
amount depends on the length of the route - it is easily possible to trade yourself
into bankruptcy.
8.3.
Also look out for privateers -
they steal resources as they are travelling the trade route. Dispatch your privateers
to chase them away.
8.4.
Trade does seem to improve your
relationship with the other power, though, and may sometimes be worth it for
that reason alone.
8.5.
[Rather than trading for resources
you want, get them by conquest: before taking a province from an enemy who surrenders
to you, use the "Show Production" setting on the map to see the top
4 products made by each of their provinces - and take one which produces things
you want.]
8.6.
Your trade adviser is a junior
merchant banker. He figures out whether a trade is roughly worthwhile in equivalency
terms - but has no clue whether it is DESIRABLE. Do you want the stuff it offers?
Are you willing to part with the stuff you would be trading away?
8.7.
To prevent silly trade offers
wasting your time use the SET POLICY screen to identify what goods you want
to trade for, and what goods you are willing to trade away, and turn on the
Trade Adviser. Then you can do the more complex stuff manually, without being
bothered by silly proposals from people who should know better.
9.1.
Lets assume you gather lots of
troops into one area to build a mega-army, and you build a depot to supply them.
To supply them, your commissary will draw down on your cash and food reserves
- until one is exhausted. Remaining units will forage automatically. Typically
this means all cash will be expended and a heck of a lot of food.
9.2.
In the next month, several units
of population will starve - they were going to be eating the food that went
out to supply the army! That will reduce your tax income, and probably your
food production (some of them were farmers), and reduce your national morale
(which may reduce your productivity). That means there will be less money and
food to spend on supply... Your overall economy will continue to shrink until
there is so little excess cash being produced that your food production is adequate
to maintain the population AND provide whatever supply you are paying for. In
the worst case, this won't happen until national morale has collapsed and you
are forced to surrender to all enemies.
9.3.
NOTE: supply costs are highest
in enemy territory; medium in friendly territory; and lowest in your own territory.
Supplying an invading army is very difficult. Supplying units at home will make
sure that there aren't any forage losses there absorbing the reinforcements
- if you can't spread them out enough to forage-without-loss.
9.4.
What should I try?
o
Try setting an invading army to
forage, BUT STILL BUILD THE SUPPLY CHAIN. That way reinforcements will refill
the units for the forage losses. THAT IS HOW NAPOLEAN CONQUERED EUROPE.
o
If you are going to pay for supply,
produce lots of excess food, and watch what actually happens in your economy.
9.5.
Oh - and to recover an economy
that is out of control, make excess food so you can build the population back
up. But I'd start a new game.
10.1.
SETTING RALLY LOCATIONS ON THE
STRATEGIC MAP
10.1.1.
Set rally locations EARLY
·
Allies will respond to the rally
location commands you give them - but it takes a while:
·
Firstly, they don't even know
about the rally location until after the current movement phase ends - because
the messenger doesn't reach them until they have already given their orders
for the current turn.
·
Secondly, they have to move units
there.
10.1.2.
Clear or move rally locations
·
Your allies will continue to obey
the rally location instruction long after it became irrelevant - either move
it, or clear it so they can make their own decisions. Especially remember to
do this if you go to peace with the enemy - your ally will still be obeying
the rally instruction (if they can).
10.1.3.
They won't obey rally locations
which are at sea.
10.1.4.
The best rally locations in my
view are:
·
the enemy capital
·
in the obvious path the enemy
must take to get to your capital (ie. as Sweden I had Russia rally at Malmo, preventing the French getting in)
·
an area from which you can call
them into battle as reinforcements (ie. neighbouring lots of areas where you
expect battles to occur)
10.2.
DETAILED COMBAT
10.2.1.
Your supply caissons can supply
allied units - look for any that need it.
10.2.2.
The AI generals will take your
positions into account when manoeuvring - including protecting your disordered
units etc. I have had situations where I created a partial line, and the AI
slotted onto the right flank just as I wanted them to!
10.2.3.
You don't share visibility information
in detailed combat (reflecting the poor-by-modern-standards cooperation that
is the best possible in the period), so you might want to send a unit (or a
partial unit created with the split command) to keep an eye on their part of
the battlefield.
10.3.
C: GENERAL
10.3.1.
You can make good treaties with
allies - access and shared depots don't make much sense since that is something
they get for being your ally. I like protection and mutual defence pacts, though!
10.3.2.
If you want to conserve your allies
troops, consider putting depots down to help them if they will be moving through
an area where you can do this easily and they cannot. They still pay for the
supply you just pay for the depots (which are expensive).
10.3.3.
You can set rally locations for
allies even when you are not at war with the people they are fighting - they
will ignore such orders if they are in territory they are not allowed to access.
You could, for example, rally them in your territory where (perhaps) their enemy
wont follow them. The reverse is true too - if you are at war but your ally
is not, you could rally their forces to the appropriate border before you make
a treaty to get them to attack...
11.1.
Blockading an enemy port prevents
it trading, and also reduces its normal monetary income by 50%
11.2.
Diplomats legal ratings affect
the number of victory points you get in a surrender: more legal points means
more surrender conditions!
11.3.
Depots cost nothing to build,
but lots to maintain. They cost twice as much in neutral or enemy territory
(but not in allied territory). Supply costs are: 1 money and one food per division
(an extra food for infantry, who march on their stomachs). That goes up by .5
money if in enemy territory, and by 2 money for divisions in excess of 20 divisions
in an area.
11.4.
In quick combat, infantry with
fewer than 4000 men and ships with less than 5 strength have to take morale
checks even without getting hit! - Don't take them into the combat with you.
(For infantry, you can transfer some strength around to avoid this!)
11.5.
Resting only helps in hexwar if
the division skips its whole turn - even rotating in place is enough to prevent
you getting the benefit.
11.6.
Don't automatically think having
units up on a height is a good thing:
·
Units on a height don't exert
a zone of control to neighbouring hexes down (and vice-versa)
·
Artillery do much less damage
when firing from a height - grazing fire does lots more damage. However, infantry
do MORE damage from up on a height.
·
So: consider having screened artillery
down at ground level if damage is more important than the flexibility of choosing
its target. [Note: damage to their morale and hence most of the chance to disorder
them is not affected.]
11.7.
Bad weather HALVES Money, Food,
Labour, Horses, Spice and Wine.
11.8.
The level of roads affects the
labour cost of all increases over its level (see 7.4.3)
12.1.
If you're up against a lot of
artillery, try putting a few infantry in the charge rank. Keeping cavalry in
the Defend zone is usually a good idea, but they are also good for charging.
Keep artillery in the attack zone, though they can also defend.
12.2.
If you're up against a large force,
think about it as a battle line--with a centre, a right flank, and a left flank.
Pick one flank to attack with, and the other to defend--or try to go up the
middle. With a smaller force, keep them clustered close together, usually near
the top or bottom of the screen, since that helps reduce the number of simultaneous
enemy divisions you can fight.
12.3.
Be sure to bring in a couple of
generals if at all possible, as otherwise rallying will be much harder.
12.4.
If you have any 'poor' units with
you, make sure they are in defend BEHIND someone else - that way they shouldn't
take any hits until towards the end of the battle.
12.5.
To withdraw from Quick Combat,
leave all your units in the routed area and press DONE. The enemy may get a
pursuit, but at least you are out of there.
12.6.
CRITICAL: Infantry/Cavalry Divisions
with less than 4000 men will have to morale check every round even without taking
damage - that means they are very likely to break and break early in the battle.
Reorganise your men to have some fuller divisions to actually stay and fight!
13.1.
This is a type of quick combat,
so review those notes too.
13.2.
Naval combat is strongly affected
by naval modifiers - for example, in 1805 Spain NEEDS to significantly outnumber
Britain to win a naval battle, AND have the wind gauge. [The Americans are
pretty good too.]
13.3.
Wind gauge is VERY important -
if you went into the battle at all concerned and the enemy got the wind gauge,
WITHDRAW.
13.4.
Frigates defend you when you withdraw,
and conduct the pursuit if you win - great!
13.5.
Any ships you capture are used
to bring your naval divisions up to full strength - any excess is lost. The
only way to get a new naval division it to build one. Your naval divisions also
slowly 'heal' while in port, based on the level of port development - again,
to full strength only,
13.6.
Britain is awesome in 1805 - the only way I could beat them was to massively
reduce their numbers in the first battle (which I lost), and then outnumber
them by lots in the second (or third) battle, when I managed to win. I got lucky
with a good pursuit when I won the battle, which refilled my naval divisions
- its lovely when it all works for you.
14.1.
Corps and armies in the same area
are automatically part of a battle. Reinforcing happens in two situations:
14.1.1.
Participation by troops inside
a city and
14.1.2.
Reinforcing from a neighbouring
area.
14.2.
In both cases, if you choose to
do it, it is automatically successful.
14.3.
Factoids:
14.3.1.
At the end of the combat, troops
from a city go back into the city IF YOU WIN. If you lose, they retreat with
the rest of the stack, leaving the city gates open for the other side. For this
reason I would NEVER EVER EVER use the city garrison.
14.3.2.
Reinforcing from a neighbouring
area moves the units into the area of the combat (ie. They don't go back) which
may let someone walk through where they were. Be careful - exuberant reinforcing
can wreak your neatly made strategic plans, either allowing some other battle
to not occur or people to slip by you.
14.3.3.
Morale in COG is on a unit-by-unit
basis, so "gamesmanship tactics" of some games of having low morale
troops reinforce a high morale force have no impact. If you must have lots of
low morale troops in a battle, consider hiding them away in a corner of the
board - they will help your force not rout...
14.3.4.
Reinforcing leaders in quick combat
don't get their pictures drawn on the screen, but do affect the battle (as do
leaders over the first three).
14.3.5.
In detailed combat, a reinforcing
unit (corps or army) can be called once per day of battle. Reinforcing divisions
from that unit arrive at the rate of 1/turn for an army, 2/turn for a corps.
The divisions start arriving on the turn after reinforcements are called and
cannot move the first turn they arrive (additionally, they arrive fatigued and
with a small loss from their optimal morale; artillery arrive tangled and must
spend another turn untangling.)
14.3.6.
QC reinforcements have to make
a check: if succeed they are placed in the player's defence area, if fail they
are placed in the rout area (and may be rallied into battle as any other unit
that starts in the rout area).
15.1.
After quick combat there is a
chance for pursuit -- 50% the loser slips away without pursuit, 50% of having
pursuit. In pursuit, pursuing cavalry make a check to see if they score a hit;
retreating cavalry make a check to see if they block a hit. "Hits"
are then randomly distributed among retreating units and cause on average 1,000
casualties.
15.2.
In naval combats, frigates cause/block
hits.
15.3.
In detailed combat you get 3 turns
to do as much damage as you can, while they don't fight back (exception: particularly
high morale units might still be able to attack - watch for cavalry and guards).
15.4.
In COG, units can only retreat
one area. They MAY violate the border of a non-allied major power in retreat,
but can't retreat into the sea. So if you can put a division in the areas surrounding
a main stack, and then defeat the stack, they all surrender! [A solitary division
counts to prevent retreat - it doesn't have to be a corps/army - go Cossacks!]
This is the fastest way to force someone to the surrender table!
16.1.
The manual tells you how - here
is some WHAT and some WHY.
16.2.
The role of infantry is to fix
the enemy in place. Either infantry fire attacks or artillery can be used to
disrupt their formation. A charge - infantry will do, but cavalry is best -
does the actual killing.
16.2.1.
Try not to charge an enemy until
after their formation is disrupted - sometimes you have to, but it is less efficient.
16.2.2.
Ideally, establish an infantry
wall, in line formation, and have the enemy come to you (in column!). Have the
artillery firing over their heads (from a mound or hill). When the enemy are
in disorder, have the cavalry charge them (then the cavalry comes back where
it is safe to let the horses recover from the trauma).
16.2.3.
Infantry can be used as a poor
mans artillery with fire attacks, and can be used as a poor mans cavalry with
charge attacks. Cavalry can't do the job of artillery (if a cavalry charge is
used to disrupt an enemy formation, you probably won't get any more use from
that cavalry division for quite a while), and artillery isn't much good at the
job of cavalry (disordered troops are harder for the artillery to hit than nice
neat lines).
16.3.
You do the least damage if you
fire at their fronts - you do the most if you fire at their backs. You do the
least damage firing behind yourself, and the most firing forwards. So ideally,
fire to your front up their rear!
16.3.1.
Corollary: fire into their flanks
in preference to head on.
16.3.2.
Don't charge them head on - thats
what they trained for. Charge them from the flanks or rear.
16.4.
Column formation is for moving.
Line formation is for firing and charging. You can move in line, and you can
charge in column - its just not what they are for. However, far better to fire
and charge in line than to stand around in disorder. Assess your chances of
the formation change, and the threat of the enemy taking advantage of some disorder,
and decide. [Hint: resting a turn may improve your chances. Moving out of enemy
zone of control helps too.]
16.4.1.
During the pursuit phase, forget
line: you need the movement capability to catch up with them and charge. And
charge. And charge.
16.4.2.
Please dont give me a detailed
discussion of the historical attack column and why it was so effective for
French charges. Ive heard the story. WCS say maybe in a sequel. Similarly,
I understand that artillery were really limbered or unlimbered, and that limbered
artillery werent much good in a fight. But this is a division. Think of it
as an abstraction.
16.5.
Fresh troops do the most damage.
Non-fatigued troops do well. Fatigued troops do poorly. Disordered troops can't
attack. Routed troops are done for.
16.5.1.
Rest your forces: you usually
do more damage attacking every second round and resting every second round rather
than firing every round!
16.5.2.
The morale and fatigue recovery
(and 'rallying') improve with a general: move your general to the division who
needs him the most. This is a far more important use of generals than their
combat bonus.
16.6.
Your strategic goal in the battle
is to kill as many enemy soldiers as possible. Every soldier who dies won't
be fighting you in the next battle or the next war. (And to take over their
artillery so you can use it henceforth.) Your tactical goal is to win the battle,
which is about manipulating MORALE.
16.6.1.
Try to have a safe haven where
you can move units with low morale (or currently in disorder) so they can recover
without being further attacked.
16.6.2.
Pick the enemies lowest morale
units, and focus on them: it only takes a few units breaking for a ripple effect
to cascade through the enemy. Concentrate your fire.
16.6.3.
The enemy will be trying to have
a rest and recovery area too. If you can sneak some units in there to make sure
those units are routed rather than resting to come back in the battle, that
is a great thing to do. (Hint: reinforcements can be particularly good at this.)
16.6.4.
Attacking units which are already
routed is only done for the strategic goal: for the tactical goal you would
let them run away and focus on the next unit to break.
16.7.
Units in supply do oodles more
damage than units out of supply (although charging is still OK out of supply).
Keep your guys supplied.
16.7.1.
Ideally, have a depot in the area
before the combat occurs - that will make sure you get lots of caissons.
16.7.2.
If you don't get many caissons,
(a) take some of his [a really good charge will take them over and you can use
them for the rest of the battle]; (b) ending your turn in a village or fort
gets you some supply - if you are resting to recover morale/fatigue, why not
do it in a village?
16.7.3.
The enemy know how important supply
is - if they get a chance, they will rout your supply caissons. Protect them!
(They can make great bait!)
16.8.
Sometimes you should give them
a target. Let them fire at a particular unit. Have that division send out skirmishers
if possible to reduce the damage they take. And don't have them fire back: they
need to rest to recover the morale they are loosing. And make sure you pull
them out if their morale starts to go or they get in disorder - they aren't
there to sacrifice themselves: they are there to make the enemy waste their
ammo while you are doing horrible things to them!
16.9.
The enemy will use cavalry to
get you out of line formation and into emergency squares. That is not a tactic
I use. You can try to use it if you like. I often find that the first phase
of the battle is me waiting out the enemy cavalry: they normally exhaust themselves
before their infantry get into close combat. When I want my cavalry is when
there are lots of disordered units around: I save my cavalry for that. [Historically,
French generals used their cavalry the way I do. Prussians tended to behave
more the way the AI does.]
16.10.
Ordered units cannot move through disordered units. Disordered
units CAN move through other disordered units.
16.11.
The aim is to get an enemy unit into disorder and then
charge through it (multiple times!) - Just shooting at a unit might kill 23-390
men: with a charge, 363 up to 42,000 are possibilities I have seen (with 1000-3000
being 'normal'). [The 42,000 was a fresh heavy cavalry unit in line formation
charging the rear of an out-of-supply routed infantry division which was standing
on ice. And no, there weren't that many of them.]
16.11.1.
Don't usually charge a unit that is not in disorder (unless
its morale is broken) - sometimes it is worth it as a tactic to try to put them
into disorder...
16.11.2.
How else to get them into disorder? - Artillery bombardment
is the very best (this is what artillery is for - the casualties they inflict
is quite secondary)
·
firing into a unit from different
directions can put them into disorder
·
try to cut them off from supply
and use up their ammo
16.11.3.
NOTE: don't do what historical generals did and have
units pair off attacking each other. Do what Napoleon taught the French army
to do: concentrate fire on a few units, and drive them from the field of battle,
then switch your aim to other units (but keep your fire concentrated)
16.12.
Warning: if you charge with a unit, it may end up itself
disordered. Enemy units may then try to take advantage. The AI is GOOD at doing
this - if you charge forward with a cavalry to get that enticing artillery unit
on his frontline, your cavalry wont be coming back!
16.13.
If a unit is in disorder, pull it away from the frontline
- a) so it can't be charged and (b) because being out of the zoc of enemy units
helps you getting back into formation. Get used to the idea that units need
to be pulled back and rested to get them back into order - otherwise, the enemy
will chew you up.
16.14.
For this reason, don't pack the line of combat with units
- you need space to pull some units out and push other units forward. Cramping
yourself will create a situation where the frontline disordered units can't
be pulled back, and hence will stay there till they (and your army most likely)
rout.
16.15.
The way the rules work, when a unit is routed all units
on its side within 6 hexes take a morale loss of .5. Units that have morale
less than the unit that was routed take an additional loss of .5. So if you
manage to rout an enemy guard unit, all the other units in the area take a loss
of 1 morale. So sometimes it is worth charging a unit a few times even if it
puts several of your units in disorder -- but whether it's worth it or not to
do this really depends on the situation.
16.16.
In detailed combat, morale is unit by unit, but the "your
troops are beginning to panic" is calculated by looking at the total number
of troops that are have broken morale -- if you have more broken units than
ordered units (disordered units with >0 morale don't count either way) then
your side begins to panic. That message causes a significant morale loss to
all your units - often enough to kick you over the edge.
16.17.
If you have 3x as many broken than ordered then you are
forced to retreat.
16.18.
Having low morale units in reserve can make all the difference
(by reserve, I mean not engaged in combat and far enough away not to be affected
by it). However many low morale units can become a liability if the enemy can
find them and turn the lot of them.
16.19.
When a hexwar battle starts, your units will be strung
out near one side of the map, and the enemy strung out on the other side. The
degree of 'stringing out' is based on
·
your corps/army structure - units
in the same corps will be grouped etc
·
Your leadership - better leaders
mean you are closer together.
16.20.
You will be quit near the enemy. CAUTION. A favourite
tactic is for enemy cavalry to charge your artillery or supply caissons in the
very first turn. Your priority in the first turn or two should be to get the
artillery screened, and the supply caissons behind your lines / surrounded by
friendlies.
16.21.
By the way, if you try charging an enemy artillery or
supply caisson in the first moments, they will usually surround your cavalry
unit, and it won't be coming back until it is routed. You can consider doing
that to them: just make sure you are making a decision about the ground the
battle is fought on, not just reacting to them.
16.22.
Sometimes you won't be able to see any enemy units at
the very start - I would use tentative cavalry advances (ie. use half their
movement points, leaving some for running away) to identify where the enemy
are exactly. NBB: they will be sort of in a mirror position to your own on the
map, not out in a corner or anything.
16.23.
Kill opposing generals by doing lots of damage to their
corps charge into it, fire point blank with artillery whatever. And dont
leave Napoleon in a corps that is taking enemy charges hell die, and then
youll be very sorry! Remember: generals are far more important for their impact
on rallying than for their effect on the combat itself move them around.
17.1.
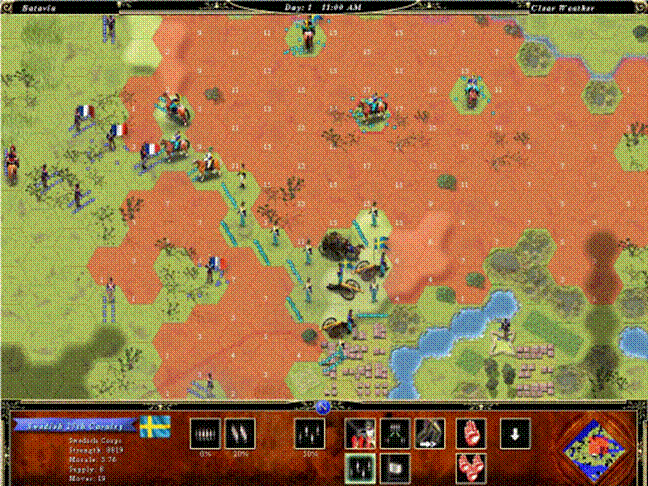
I've been asked about the line
of battle in hex war - here is an example, with some comments. (I am the Swedes,
facing the French)
17.2.
Note how I am using the terrain:
17.2.1.
The water/city provides a nice
protection for my left flank.
17.2.2.
I have artillery on the heights
where they can fire over the heads of the infantry. They are MUCH less effective
at killing people this way, but they can choose their targets with ease, and
are still pretty good at disrupting enemy formations. Its a compromise. [In
other battles I would have the arty on the flat, and inf on the hills.]
17.3.
Infantry and some arty are in
line formation to do the max damage
17.4.
I deployed half my cavalry to
protect my right flank - the other half were used in early charges (The French
were silly enough to have militia that were close to me at the start try to
get into line formation - they disordered, so I finished them off - they are
routing to the NW now.) Those cavalry are well to the rear, resting.
17.5.
My supply caissons are protected
17.6.
There is no hex the enemy can
reach from which they could possibly charge my artillery which is not also bordered
by an infantry unit (which prevents any such charge: this is called screening).
Supply caissons can be screened too.
17.7.
If I had guards with this army
(sob), they would be centrally located, to boost as many units as possible.
Possibly in reserve.
17.8.
What next -
17.8.1.
Having the infantry right up next
to each other isn't really necessary (well, it prevents cavalry from threading
through the line, but the enemy cavalry is nearly done): I will stretch the
infantry line to the East, allowing the cavalry to be used as enemy units disorder.
Ideally the cavalry should be just behind the front line, waiting for a chance.
17.8.2.
I'll watch the baddies: several
corps are moving NW rather than engaging with me - I might swing my line around
to run North South to bring those corps into the range of my guns
We will see.
Here are 10 steps I execute at the very first turn of a game,
no matter which country I am.
18.1.
OPTIONS: On the options page, turn off "always use
quick combat" - then you can choose detailed combat when there are more
than 30,000 mean on each side. I would also turn off "reinforce from city"
- but this is a tactical suggestion.
18.2.
ECONOMY: On the economy screen, change recruiting to
optimise morale - I set it to 21-40 year olds and 20 months of training. That
will increase morale of reinforcements to 4.70. Increase draft size to maximum.
Increase tax rate to 20% for now. (Do NOT play with your feudal setting - this
has big ramifications and you need to be ready for it.)
18.3.
PRODUCTION: Go through the province details, setting each province
to maximum production of something they are very good at, and put all the rest
on something else you need. The default settings of a little from everywhere
are silly. Make sure when you finish that you are producing MORE food than you
need and will accumulate resources for your building program (both to your cities,
and new units). Identify any resources you make lots of (and hence would be
willing to trade away), and any you would be willing to trade for. [Note that
horses, wine, textiles, iron, spices and luxuries are all scarce for some countries
- if you can produce some extra to use for trade, do so!]
18.4.
POLICY: Go to the Set Policy screen, and adjust the trading
defaults (whether you control this manually or with the adviser, set this screen
- it will save you time and effort!). For example, Prussia might be willing to export horses, iron, wool, and spices and want
to import money, luxuries, and wine.
18.5.
TRADE: If you are trading manually, try to make some
trade offers. Caution: trade routes you propose cost you a little money to maintain
(the amount varies with distance, and is less if both ends are ports): if money
is a big problem, don't propose any. If you can afford it, set up at least one
trade route with each neighbour - it will improve your relationship.
18.6.
TREATY: Make your first treaty proposal - you can make
one a month, and you should make a treaty with every country you are not at
war with over the first months of the game: think of it as establishing relations.
18.7.
UNITS: Now lets consider our military units:
18.7.1.
No country in the game starts with an optimum assignment
of divisions corps/armies. In this first turn, lets try to get things on a
better footing. Only France starts the game with corps (and 5 neutral minors,
btw), so they can get many more units into an army than anyone else - which
lets their leaders have a bigger effect and assures the units don't get split
up. An ideal force should be about half infantry and a quarter each artillery
and cavalry: your force mix probably won't be in these proportions, but this
gives you an idea how I would split things up, and what units I would be building.
18.7.2.
If you have choice of which units to use, consider their
morale and use the better ones.
18.7.3.
Change EVERY army and corps from "use supply"
to "forage". Now you can cautiously allow paid supply in rare circumstances.
(Still build supply depots at key areas - they get you supply caissons in combat
and preferential reinforcements.) You will take some foraging losses, but hopefully
reinforcements will keep topping up the units.
18.7.4.
Most countries forces start partially depleted (as if
readiness was only just turned up to 100%). Consider transferring men from poor
morale units into high morale units of the same type (ie. pumping militia into
infantry). If you want the poor morale unit to get reinforced, make sure you
leave 2000 men in it. If you would rather be rid of the division for good, take
all the men!
18.7.5.
CAUTION: Do not go into quick combat with infantry/cavalry
divisions under 4000 men - they will rout without doing much for you. Transfer
troops!
18.7.6.
If you have spare army/corps counters, fill one with
whatever you have left over, and use it to siege things. (I often call this
the 'militia army').
18.8.
DIPLOMATS: Make sure you move your diplomats - if nothing
else, have them work on charming a neighbour, or pressure peace on an enemy.
18.9.
NAVAL: Consider your naval units: every nation starts
with at least one merchant and a privateer - you want the merchant in a high
paying sea area, and the privateer(s) in a different sea area where there is
either an enemy trade route, or somebody else's merchant. Get them going.
18.10. ADVISERS:
Last check - did you turn on all the advisers you want? They really help when
learning the game. Beware that they development adviser may rearrange all the
province labour allocation we set, and the economy adviser may change the economy
settings - I would always turn at least these two off.
19.1.
If you sail into a port which you own (or is owned by
an ally) and then end your (naval) movement, your troops can disembark and keep
marching the following month.
19.2.
Be wary - your fleets will move much more slowly when
they are laiden with troops: about 2 sea areas a month?
19.3.
Some beta users had difficulty with the interface here:
think of land forces moving before naval forces (they don't, but this will help
you issue orders that will actually be carried out). So:
·
move the fleets into the province,
end turn
·
load the troops and sail out,
end turn
·
sail to destination sea zone and
end turn
·
disembark the troops
19.4.
While on board the fleets, your troops will be foraging
in a zero-forage zone. To pay for supply, create a sea supply chain...
20.1.
OK - here is summary data I find
interesting.
20.1.1.
The first few columns are pretty obvious. They don't
include the city garrisons.
20.1.2.
"Max Glory" is the most glory a nation could
earn from its Political Goals.
20.1.3.
"Cities" includes provinces, conquered provinces,
and protectorates.
20.1.4.
"Money" is the base money produced by the provinces
(unaffected by population or banks etc) - so this one isn't much use, but its
something.
20.1.5.
For the ship counts and morale, I have included all ships,
not just warships.
20.2.
Other amusing factoids:
20.2.1.
Turkey is actually the most capable nation for producing wool+cotton+luxeries
- with the second highest luxeries capability (also up there are France and Austria).
20.2.2.
Turkey also produces the most food (just pipping France), equal second for horses (after Prussia, and equal with France and Austria) and the most spice+luxeries (leading Austria).
20.2.3.
France has an initial population of 139 - Britian 35 and Sweden 24.
20.2.4.
In a per-city sense, economic capability (adding up all
the resources) France and Sweden are up the top, Britain, Prussia, Austria and Spain in the middle, and Russia and Turkey have the worst.
20.2.5.
Again, in a per-city sense, current
development (adding up all the levels of developable things like factories and
banks), Sweden, Britain, Prussia and France are the most developed, Austria and Spain next, with Russia and Turkey last. For the 1805 (default) scenario:

21.1.
Cavalry will always get disorganised if you charge an
organised enemy - but not always if you charge a disorganised enemy - and there
is an upgrade to help. I reserve my cavalry for charging disorganised enemies
(and artillery).
21.2.
The chance to reform is influenced by upgrades, type
of unit, terrain you are sitting on, turns resting since the charge, distance
to nearest friendly disordered unit, and whether you are in enemy line of sight
as well as a number of other factors. All of these influence the chance, none
are 'binary' - so:
21.2.1.
Move the unit out of enemy line-of-sight, and preferably
more than 5 hexes from the nearest friendly disorganised unit [I don't know
but I suspect that enemy disorganised units affect this too, so I get away from
them as well!]
21.2.2.
Get into a hex of 'open' terrain - not city, not wooded
21.2.3.
In my opinion, the chance of 10% working is about 1%
- I don't even try if the button for column says 10%.
21.2.4.
If you move the unit at all, you might as well hit the
10% button - resting the rest of your movement points won't do anything [resting
is an all-or-nothing thing].
21.2.5.
I may be wrong about this, but my perception is that
leaders don't actually help very much with cavalry reforming after a charge,
although they do help lots with units changing formation usually. Move the leaders
to somewhere more interesting while the horses recover
21.2.6.
Just let the horses sleep at night - in the morning their
chance to reform will go up HEAPS: they are used to starting work first thing
in the morning.
21.3.
Even with these notes, irregular cavalry with low morale
usually only get one charge per day. But Lancers tend to be OK to go again after
only a couple of turns.
22.1.
Some notes from Alaric_31, whose research gives some
indicative numbers of how the economy changes with different difficulty and
power settings. (Power also impacts starting forces.) [Using France in 1805 - standard scenario]
Minimum Difficulty (Easiest) and Maximum Power (+3) give a tax income of 1289$.
Minimum Difficulty (Easiest) and Lowest Power (-3) give a tax income of 407$.
Maximum Difficulty (Bonaparte) and Lowest Power (-3) give a Tax income of 297$.
Maximum Difficulty (Bonaparte) and Maximum Power (+3) give a tax income of 959$.
It affects resource production as well, but this settings by the designers give
a great variety of difficulty levels -- a very good thing, I think. People that
go to bankrupt can try tweaking these settings for a more easy play.
23.1.
The manual is confusing on this - partly because it seems
to give us extra information we don't get for other goods, and partly because
it just ain't clear.
23.2.
Each province has independent values for the production
of wool, cotton and textiles. Wool values are 0, 1 or 2 (except for Flanders
which is a 4). Cotton is much scarcer, mainly being produced in North
Africa (some 1s and 2s, and a 6 and 8 in
Egypt). Textile capability is well spread, with half the provinces a 1 and
half a 2 - everyone can produce Textiles - (plus Picardy
is a 3).
23.3.
The more labour you allocate to "textiles",
the more of each of these is produced. Labour allocated to other areas does
not help at all. Provinces that do not put any people to work on textiles do
not produce textiles.
23.4.
Note that the total population of the province has a
very large effect on textile production (as opposed to some others where it
is a smaller effect).
23.5.
Wool and cotton are affected by FARMS; Textiles are affected
by FACTORIES.
23.6.
Some provinces produce textiles, but do not produce much
if any wool or cotton (for example, Krakow and Normandy are both 0 0 2 provinces). If lots of people work on textiles in these
provinces, they will be drawing down on the national stockpile of these products
to produce the textiles. This is more likely to happen in provinces with lots
of factories and few farms.
23.7.
Your workers will work simultaneously on 2 wool and 1
cotton if there are any available, at no extra charge. So try to have both available
to maximize the textiles being produced.
23.8.
Finally:
23.8.1.
Textiles suffer more from waste than anything else -
the 80% loss rate cuts in much earlier. That means you need to work harder to
get 'em. [I often do lots of manually trading to collect extra textiles.]
23.8.2.
Textiles have a special barrier: textiles produced that
would put your stockpile over 100 are consumed by the population (increasing
your national morale) for no benefit to you. If your textiles get over about
80, spend them [unless you are saving up for something that costs 100]. Better
to have the build order sitting in a queue than to lose textiles to the darn
populace! [Its actually 100 + this months production, which is why you will
see higher numbers.]
24.1.
In COG 1.1 there are a few province weirdness (well,
they seem weird to me) [note: under the hood anything that can have troops of
its own is called a player, and any territory on the map is called a province
- a player that can have a human is called a nation]
24.2.
There are two multi-province players who are named after
a subordinate province - Batavia (of Batavian army fame) has its capital in Friedland, and Morocco has its capital in Oran. To conquer or liberate etc go for the regional capital, not the province
that just happens to have the same name as the player.
24.3.
Several players have a different name to their province
(besides the ones referred to above):
-- Tripoli becomes Tripolitania
-- Venetia becomes Veneto
-- Zealand becomes Denmark
-- Lower Egypt becomes Egypt
-- Krakow becomes Poland in 1792 (and Krakow the rest of the time)
-- Pest becomes Hungary
-- Banka becomes Algeria
-- Damascus becomes Syria
In these cases, the player name and the province name can be thought of as interchangeable.
24.4.
Berg and Sicily, while they can be players in their own right, start as subordinate
provinces of other players. That can mean that ceding or liberating the larger
player will detach them. Similarly, Poland in 1792 starts with half a down subordinate players: you can separate
them.